BAAH-1 Update
Summary update on BAAH-1, the L-1 cert bird. Okay, more than simply update: more of a recent history, since it’s now been quite some time since my last BAAH-1 posting. In fact, I started this update back in November 2014!
Construction at that time was mostly complete. The only things remaining were the avionics bay (it was built, but the contents were not laid out, attached, and wired), some shear pins (especially given the loose fit between the airframe and the avionics bay’s couplers), lettering, final attachment of the launch guides, and connecting up the parachute.
Unfortunately—though not too surprisingly, given the history of this rocket—it’s a bunch more massive than the original design and sims. Enough so that I need to change motors: it’s up to about 2650 grams. That’s what happens, though, when you go not just with Blue Tube, but also add a bunch of steel blind nuts and such for launch guide attachment. Certainly the balsa nose cone (instead of a hollow plastic one) doesn’t help overall mass, but at least I knew about that.

Launch!
First, the punch line. The rocket flew: flew great, in fact. I have my L-1 cert (and my wallet is open: note my AS-501 project, and Folie à Trois). But, there’s more to the story.

Fin Arrangement and Attachment
With the nose cone assembly and fin prep complete (see this post), there was still a bunch of building to do, such as attaching the fins. Relatively straightforward—see the picture to the right—though I filleted like crazy at all joints, inside and out, using 30-minute cure epoxy on the outside joints, JB Weld on the inside joints. More about the fin arrangement later.
It wasn’t too hard to take care of the mechanicals in the av bay. These included, though, static ports (and vent holes in the airframe), and, as noted, drilling and threading holes for the shear pins. The shear pins weren’t completely straightforward: despite using Blue Tube, I wanted to ensure a good cut on the pins, and good longevity for the airframe. So, I cut some brass shim stock, ground some depressions, and placed the shim stock beneath where the shear pins will go. This allows the brass to cut the pins and take the load, not the Blue Tube. You can see the laid-in but not yet drilled shear pin cutter below.
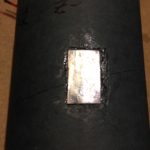
Shear Pin Cutter
Two other holes needed were for the master avionics switch and an LED to indicate master power to the avionics.
The last bits on the avionics bay were the final wiring to connectors, so I could assemble and disassemble the bay, along with placement and wiring of the ejection charge connectors on the outboard sides of the bulkheads. Again, nothing complicated.
Why all these avionics? I had plans to fly dual deployment, though the certification flight would be simpler: altimeter deployment, with motor deployment backup.
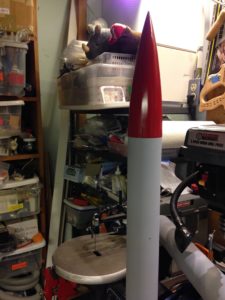
Nice red nose!
Painting was an interesting situation. I wasn’t just building any old rocket for my L-1 cert bird: BAAH-1 is a full-scale model of Auk XXXI, the last rocket that Homer Hickam and the Coalwood Rocket Boys flew. (But what about the Miss Riley, the last rocket flown as depicted in October Sky? According to an email conversation I had with Dr. Hickam in July 2000, there was no Miss Riley: their last rocket was simply the next in the Auk series, Auk XXXI. In that email exchange, I also got the details of Auk XXXI: diameter, height, materials, paint, and approximate fin size, planform, and arrangement. It’s on the information from this exchange that I built the rocket.) Auk XXXI was a steel tube with aluminum fins and a turned spruce nose cone, painted red (see picture at right). The tube and fins were unpainted, except for “BCMA” across the top and “Auk XXXI” down the face of the steel tube.
Dr. Hickam also explained how the fins were attached to the rocket. The fins were pieces of sheet aluminum, with the corners snipped. Each piece made up two fins, and was bent to conform to the rocket’s body and then stick out into the airstream. From the bottom of the rocket, they looked more like an X than like a +. So, that’s what I did, though with wood and slotted airframe, not bent sheet aluminum.
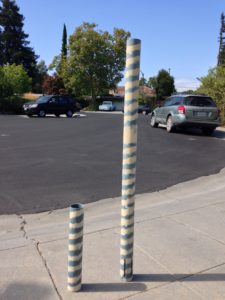
Body tubes ready for priming
To make the tubes look more like metal, I filled the spiral winds, then sanded. The picture on the left shows the upper and lower tubes filled, sanded, and ready for primer. With a little hunting, I found two different shades of silver-ish paint, the one I thought looked more like steel for the body, more like aluminum for the fins.

Flush-mounted Blind Nut
For initial launch guidance, the Rocket Boys used a launch rod in the ground and ¼” eye bolts on the rocket. Easy enough to model those: my Auk XXXI also has ¼” eye bolts for the initial flight guidance. At the right is one of the flush-mounted blind nuts used with the eye bolts. Though straightforward in concept, I wanted a truly flush mount, so that when primed and painted it look like it was simply a threaded hole in the side of the rocket. Using a grinding bit and a drill press, I ground out a depression on the airframe tube, then ground the blind nut’s base so it was thinner and bent the base to match the curvature of the tube. Some epoxy, and I was ready for primer.
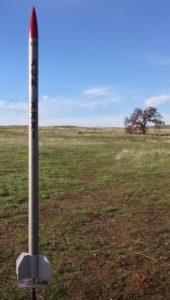
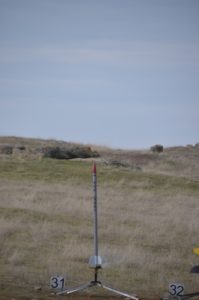
Auk-XXXI Ready to Fly
My younger son did the lettering for me.
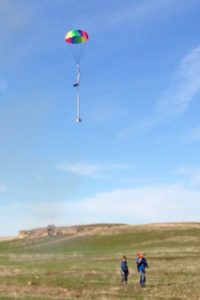
Auk-XXXI under canopy
Everything finally came together on December 6 (yes, 2014). The rocket was ready, LUNAR was cleared to launch at the Orvis‘s Snow Ranch, I had the motor and casings. Right. All except the last one. I had the casings, but not the right motor. Remember the rocket had grown heavier? That meant a late change in motors. Thanks to Mike at Bay Area Rocketry, I was able to get the right motor, an H-148R, at the launch, last minute.
Since December 2014, I’ve flown Auk XXXI a few more times, on different motors, including White Lightning (bright yellow flame with white smoke) and Black Max (dense black smoke). Here’s a launch sequence from January 2016.
Ignition
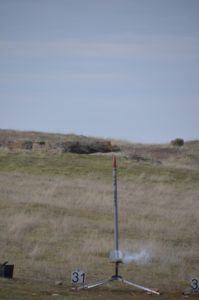
Pressure builds in the thrust chamber
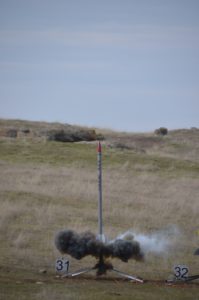
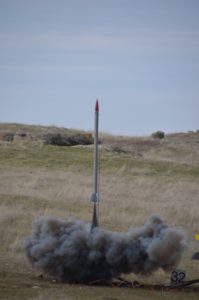
Launch!
Initial climb

Tower clear!