Odd Looking, Good Flying!
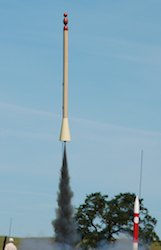
 When last we visited Bed Knobs and a Broomstick, the nose cone had just been finished. I am very please to say that the first flights were very successful!
It was a simply gorgeous day at Snow Ranch in Farmington for LUNAR’s May 1st launch. We were treated to lots of wonderful flights: Steve Jurvetson’s Sledgehammer, Jamie Clay’s Mercury Joe, Alan Thym’s Blade of Death, some fabulous TARC flights by Westmont High, and I could go on for a long time. LUNAR’s photo gallery of the launch will give you a good (though mostly static) taste—well, except for Alan Thym’s luscious chili!
Back to Bed Knobs and a Broomstick.
I managed to finish painting the rocket the day before the launch. For construction details, you can view the photo album (there are also some flight pictures there). The build and finishing were not without their challenges.
- The nose cone was heavier than RockSim calculated. This made the rocket very over-stable. Not a big deal, and ameliorated a bit by the fix to another problem.
- I built a set of Kaplow Clips for motor retention. Since this is designed as a G-powered rocket, I wanted something pretty solid. I didn’t need the expense of something like an Aero Pak retainer, either. Solution: a pair of blind nuts behind the after motor mount centering ring, anchored in two small pieces of balsa each, with an aluminum window screen retaining clip screwed into each blind nut. The balsa cracked a little, which wasn’t a big problem, certainly not one that couldn’t be overcome with a little epoxy. One of the blind nuts ended up just a little too close to the motor mount tube, because of a minor conceptual error in laying out the hole. No big deal: Moto-Tool to the rescue.
- I glued the aft cone (the fin substitute) together, then installed all the launch lugs. The aft cone was not yet on the rocket! Hooray for rubber cement, which is what I used to hold the aft cone together: it was easy to peel apart the top 5 cm or so, allowing the aft cone to slide down over the launch lugs.
- Flight experience says I should have used a single solid launch lug inside the aft cone, instead of two pieces (one at the very aft, one at the front of the cone). It would have made it much easier to get the rocket on the launch rod.
- It was windy when I painted the body tube. I was running out of time, so I didn’t have much choice, and some family circumstances made it even more difficult to wait until the wind died down a little. After beginning to paint, with the rocket standing on its aft end, I had to leave the rocket. I should have had someone stand watch, or found another way to do what I had to do: the rocket blew over, and landed in just the wrong way. The body tube kinked. After the paint dried (barely enough), I was able to section out the kink and splice the body tube back together with a tube coupler. Minor disaster averted.
- I should have clear-coated the nose cone a day earlier, to give it longer to dry before handling it to install in the forward end of the rocket.
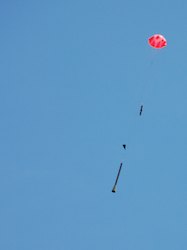
- RockSim indicated that a 6¼ second delay would be ideal on an G38FJ. That seemed long, but I went with the closest thing: 7 seconds. I was right, RockSim was wrong: 4 seconds would have been better. Much too long after apogee, the parachute popped out (and I breathed again!), but the rocket was falling so fast that the forward end of the body tube zippered slightly. No big deal, and easy to repair. I used a G64-4W for the second flight, even though RockSim indicated an 8+ second delay. (Turns out the RockSim doesn’t do a good job calculating the Cd for anything unusual [thick fins, cone tails, etc.]. It’s a limitation of the assumptions made in the software.)
There are lots of little things in this rocket that aren’t part of your typical Estes-style kit.
- A couple of the centering rings and the nose section bulkhead have gussets for added strength. These are pieces of card stock (same stuff as the centering rings) glued perpendicular to the surface of the ring (or bulkhead), and glued to the inner and outer tube.
- The shock cord mount uses a yoke wrapped around an inner tube (stuffer tube, for example) and then through small notches on either side of the centering ring. (There are pictures of these details.) The shock cord mount is very strong.
- The Kaplow Clips are very easy to use, easy to install, inexpensive, and light. A screwdriver appropriate to the screws is all I need during prep to secure the motor.
 There was lots of interest in the rocket at the launch. People noticed the nose cone, people noticed the aft cone
 . Some people got the idea of “bed knobs and broomstick” right off the bat (others saw, well, something else). Steve Jurvetson titled his picture of the first launch, “Nimbus FJ lost its rider”!
I’m glad the winds cooperated: the rocket is definitely over-stable, but not as badly as I expected. This is probably another simplifying assumption in RockSim, and I’m guessing the CP was somewhat further forward that RockSim calculated. It flew well, though, and I think it benefits from a reasonably quick kick off the pad.
Unless we get an increase in our altitude waiver at Ames, this one will only be flying elsewhere. On the G64, it made about 500 meters.
A Black Jack or Fast Jack propellant looks very, very cool!